Page 1 of 2
Before Getting Started
Open and inspect wall covering for variances. Be certain all rolls are the same dye lot. Read the instructions packaged in each roll for specific hanging information. If, in addition to your wall covering you are working with border and/or fabric, it is advisable to receive and inspect all items before beginning your project.
Wall Preparation:
New Drywall - Apply primer/sealer with brush or roller. This provides a smooth even surface for the wall covering to adhere to. It will, also, be easier to remove wall covering at a later date.
Fresher plaster must be allowed to cure for 90 days before priming.
Previously Painted Walls - Sand smooth any rough spots. Fill cracks or holes with spackling compound. When dry, prime all spackeld areas. Lightly sand enameled surfaces. Be sure to clean walls with a low-sudsing household detergent. Apply primer/sealer to latex finishes to ease removability of wall covering at a later date.
Previously Papered Walls - Remove old wall coverings and sand smooth. Clean walls with a low sudsing household detergent. Apply primer/sealer, if necessary.
To prevent mold/mildew problems, wash walls with a solution of 1 part bleach to 4 parts water. This should be done before applying primer/sealer or sizing to the walls.
All walls should be sized to seal porous walls and to increase the wall's "slipping" properties. This allows for easier positioning of the new wall covering as it is being applied.
Getting Started
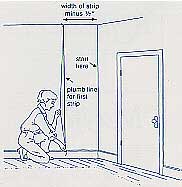
Use a plumb line to make sure your first strip and those that follow are straight. Choose an inconspicuous corner, preferably close to a window or door. Measure from the corner to a point 1/2" narrower than the width of the wallcovering. Then, drop a plumb line from that spot. When the line stops moving, hold it tightly at the baseboard with one hand and snap it with the other. The colored chalk line on the wall is now your starting point. For accuracy, snap a new line on each wall.
Cutting Lengths
Carefully measure the length required (the height of the wall), add an extra 2" top and bottom for final trimming. When using a set design mtif, cut the first length so that after final trimming, the entire motif will be placed at the top of the wall.
Pattern Matching:
Before cutting more stips remember to allow for the proper pattern match. Match dry strip to dry strip or wet to wet. Save remnants, they are often useful for small areas, i.e. above windows and doors.
Pasting (Unpasted Wall coverings):
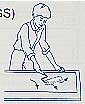
Use the type of paste recommended in the instructions. If no information is given, ask your retailer's advice. Brush or roll the back of the wallcovering with paste. Apply plenty to the edges. Fold the strip pasted side to pasted side (both edges toward teh middle). Strips should be booked to allow sufficient absorption of moisture and for the wallcovering to become supple. Normally 3-5 minutes.
Pre-Pasted Wallcoverings:
Fill water tray with lukewarm water and roll the strip pattern side in. Immerse in water tray for the time recommended in the instructions supplied in each roll. Then take the top end of the roll and pull sheet out of water allowing it to unroll as it is drawn from the tray. Change water after every 6 strips. Book the strips as described in figure.
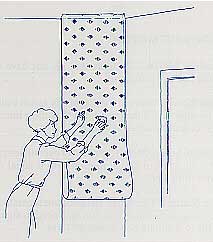
Hanging:
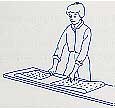
Check which is the top end of the strip and carry folded strip to the wall. Holding the top corners, open the top fold and line up to the left of your plumbline. Establish your ceiling line and allow the 2" overlap. Smooth down the middle of the strip using a smoothing brush or soft sponge working out towards the edges removing the wrinkles and air bubbles as you go (see figure below). Open the bottom fold and continue to smooth the strip into place.
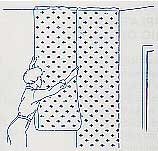
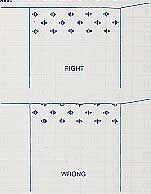
Positon the next strip on the wall beside the first and slide it precisely into position against the first piece so that the pattern matches at normal eye level. Don't push or pull seams into place. Move entire piece by sliding it over. Do not overlap edges; butt edges, if necessary, using a seam roller to gently flatten the joints between strips approximately 20 minutes after hanging. After you finish each strip, immediately sponge off any extra paste with clean water. Wash ceiling and baseboards before they dry.

(To ensure your satisfaction, hang three strips and inspect for you overall approval. If there is a problem, contact your retailer for advice. If the problem is related to a manufacturing defect, the manufacturer will replace any defective material. The manufacturer is not responsible for labor charges.)

After you have three strips up, trim them at the ceiling and baseboard using a broad knife as a guide and cutting with a safety knife. Be careful not to mar wall covering.