September 2000
|
NEWSLETTER |
Hi Everyone,
Well summer is just about over and the kids are back in school and many of you are taking a big sigh of relief. All of my kids are grown and on their own; however I remember very well what this time of year was like. Shopping for new clothes, shoes and backpacks. Then once school starts, and the new teacher provides a list of the supplies needed, we hop from this store to that one trying to find just the right spiral binder requested. And so it begins… The good news is that since my children are grown, that puts me into the next realm (Grandmother). My first grandchild, Dominic William Moore, was born July 9th which brings about a whole new perspective on children. Of course he’s going to be perfect and never do anything wrong. Right!!
As promised in last month’s newsletter I want to feature his nursery (including pictures). My daughter- in-law Cheryl created this darling room with her friend Jennifer Hamilton. The only contribution I made decoratively was help in picking the fabric and suggestions on what to do with it. This baby nursery was Cheryl’s vision and she, her mother, and Jennifer were the creators. These ideas can be used for any room, baby to teenager. Just adjust your subject material for the age and interest of your child.
Since the kids are back in school, there just might be some time for the projects you have wanted to accomplish all year, maybe even their rooms. Now’s the time! The holidays will be upon so soon, and most of us find that a good motivator. Family and friends coming for visits will often get us off dead center and started on those projects. Children’s rooms are the most fun of all to decorate. The child in each of us can relate and get into the excitement of creating a darling child’s room. So let’s get started!
|
DOMINIC'S NURSERY |
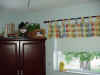
My son Matthew, and daughter- in-law, Cheryl, bought their first home in April of 2000, in anticipation of establishing a comfortable home for themselves and their first child due in July. This little house was a real “fixer-upper” and needed a tremendous amount of work. However, they saw the potential and went for it! One of the bedrooms would of course be made into the baby’s room. They knew they were having a boy, but Cheryl wanted the nursery to be perfect for either sex, so it would not need to be redecorated a couple of years later if they had a girl. We spent a little time in wallpaper books looking at all the darling papers and borders, but it just wasn’t what she wanted. She was confident she wanted to paint the walls in the nursery, (although at this point she didn’t know what), and that was clearly the direction she was headed.
Matthew was working so hard, getting the entire interior walls of the house cleaned, primed and painted and needed a color choice for the nursery very soon. I suggested to Cheryl to just paint the walls a soft baby blue, which would be a perfect backdrop for her ideas. So that’s what was done. There was now a clean, fresh canvas for whatever Cheryl wanted to paint.
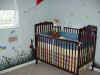
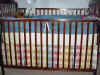
The next thing Cheryl addressed was looking for a crib-bedding ensemble that would look good with the multi-colored, whimsical plan she had imagined in her head. She and I went together one day looking at all the darling bedding ensembles. We never saw a set that we felt was the right look and Cheryl was not thrilled at parting with the amount of money it was going to take to buy one. I suggested we find some fabric and make a set (knowing that her mother would probably be willing to sew the items). So, off we went to the fabric stores. We hit them all, never quite finding enough of any one fabric. As a last resort we stopped by a fabric store that specialized in decorator fabrics. We found the perfect plaid, talked to Cheryl’s mom, and ordered the fabric. It was a little expensive, so the goal was to maximize a minimal amount of fabric. Every inch of 4 yards was used. I suggested these tips to maximize the use of the print.
-
Valances- which is a style that does not require much fabric. Cheryl chose tab tops, which only requires 1 and ½ times’ fullness in lieu of a gathered style, which would take 2-3 times fullness.
-
Bed skirt- instead of a gathered skirt, we used a tailored style, with a pleats for interest. This reduced the fabric needed for a skirt by almost 2/3.
-
Bumper pads- we chose a coordinating solid fabric and used the print as welting on the pads, thus saving several yards.
-
Comforter- we used the print on one side and a solid on the other. Which saved a couple of yards.
-
Accent pillow- print on one side solid on the other, saving another ½ yard.
Note: This fabric print was a perfect candidate for “railroading.” This is another method of maximizing the yardage available. This means that the fabric pattern can be used cut from end to end in lieu of a standard width. If the fabric has a definite pattern that is repeated, railroading is not an option.
The end result was a very custom look with a darling fabric that coordinated perfectly with Cheryl’s vision for the nursery, with minimal expense on a decorator fabric. These tips can be converted to any project you are working on.
Cheryl and her mother set about cutting and sewing until the entire ensemble was complete. Cheryl’s mother did a beautiful job on everything and was quite pleased to be able to contribute to her first grandchild’s nursery, too.
click picture to enlarge
While all this was going on, Cheryl began to formulate her plan. Her inspiration was found in children’s books. She wanted a very whimsical look, with no particular theme. She decided to incorporate lots of cute images she found in books and use whatever colors she and Jennifer felt were a good choice.
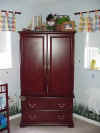
Her good friend Jennifer Hamilton is quite artistic and agreed to help Cheryl with the painting. Jennifer sketched in some of the key figures in pencil to help with the scale and eventual painting. (If you are not fortunate enough to have a friend like Jennifer and want to create this kind of room, an image projector (found at craft/art stores) will project the image from your book to the wall, so that you can sketch and paint your design). Once she and Cheryl had an overall plan, they began painting. (Note: the walls behind the armoire and crib were not treated).
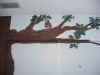
A river and large tree were the starting points. The tree extends from floor to ceiling and spans across one wall and into the sliding closet door. The leaves were stamped on with a basic leaf stamp from the craft store. It’s very easy to do!

click picture to enlarge
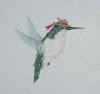
Bird and butterflies were added in mid air, but Cheryl’s favorite must have was a very cute duck leaning against the tree and overlooking the river. A crossed leg frog that is fishing and a sailboat christened “S.S. Popeye” that is floating downstream, joins him.
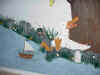
click picture to enlarge
Moving around the room to the right (actually on the closet doors), we see sitting under the big tree branch holding a curious squirrel, is a red wheel barrel filled with toys and tied to a hobbyhorse pull toy. Sitting nearby is a glass jar filled with colorful marbles, a turtle mozing along and buzzing above are bumblebees, ladybugs and a dragonfly.

click picture to enlarge
As we turn the corner (on the wall space to the left of the dressing table) is a charming trellis with a red flowering vine and a perched butterfly. Looking up you will see a precious yellow bird sporting a frilly hat and ivy trailing down the window opening.
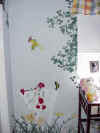
click picture to enlarge
To the right of the dressing table is a little spotted dog that Cheryl painted to help fill the open space between the dressing table and the armoire. You will also notice that around the baseboard of most of the room is grass, wildflowers, butterflies, lady bugs and bumble bees which Cheryl painted most of herself. This unifies the entire paint project.
click picture to enlarge
On the next wall is a darling post with an ever-watchful blue jay sitting on top eyeing the snail crawling down it. The post proudly displays a painted sign that reads “Dominic’s Dream Land.” Cheryl just recently added his name because she and Matt kept the baby’s name a secret until he was born. A very sweet and cuddly lamb is looking on with extreme interest and a standing bunny is peeping out from behind the crib. (A glider/rocker sits in front of this wall space, so I will show you the picture with and without the chair in place).


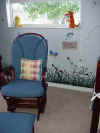
click picture to enlarge
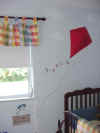
Painted over the crib and flying through the sky is a colorful red kite tied to the post, clouds, birds, butterflies, bumblebees, ladybugs and an airplane. Sitting atop a stack of large blocks is a lovable teddy, which completes the wall space in the bedroom.

click picture to enlarge
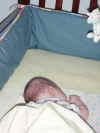
Dominic lay fast asleep as we photographed his room. It will be a little while before he enjoys and appreciates all the color, charm and creativity that was put into his bedroom. However, I’m confident that with the images and color stimulating him, he will be the brightest little baby possible. Do I sound like a proud Grandma or what!
click picture to enlarge
HAPPY DECORATING
![]()