Page 1 of 4
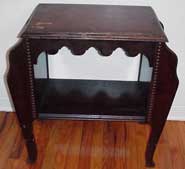
On a late October outing with my daughter in-law, we stopped by an auction house for the preview. We saw lots of things we liked, but one old beat up piece that caught our attention was and little combination end table/magazine holder. We thought the lines and details were cute, however it needed a makeover. Cheryl really liked it and we both had a vision of what it could be with a little work. That evening we went back to the auction and bought the piece very inexpensively. In the back of my mind, without Cheryl's knowledge, my intention was to redo the table and give it to her for Christmas. Cheryl then asked, if she could work on the table with me and learn what and how to redo it. I gladly accepted her offer, although she did not know she was working on her own Christmas present. We had such a wonderful time working on the table together, and I will always cherish that memory when I see her little table in her home.
You can use these same techniques on any old piece of furniture that needs a makeover. Just use your imagination and little elbow grease, and before you know you will have your very own masterpiece.
Our plan was to prepare, faux paint and stencil the table in a classic design that would provide flexibility for use. The first step we took was a visit to the stencil store. Cheryl and I spent quite a bit of time pouring over stencil catalogs and looking at samples in the store. I told Cheryl to pick the stencil pattern she liked best, and before you know it, she had a three-part stencil selection chosen for the table. Now for the dirty work!
In retrospect, it probably was not totally necessary, but I decided to go through all the steps of preparation, so the table would have a good foundation for our painting and stenciling as well as preservation of the furniture piece.
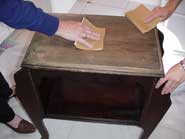 We
began by sanding with a medium sandpaper to smooth out the table
and followed with fine sandpaper for an even smoother finish. I
was not after a perfect foundation, just an improved one.
We
began by sanding with a medium sandpaper to smooth out the table
and followed with fine sandpaper for an even smoother finish. I
was not after a perfect foundation, just an improved one.
 Once
the sanding was completed and we were satisfied with the results.
Using damp paper towels we wiped the sanding dust from the table,
leaving it clean and free of dust and grit.
Once
the sanding was completed and we were satisfied with the results.
Using damp paper towels we wiped the sanding dust from the table,
leaving it clean and free of dust and grit.
![]()